.jpg)
Sometimes an off-hand remark feels portentous and resonates, like this one…
“Can you see how the gentle curve of the road is designed so that you can only see so far ahead… it makes the view easier on the eyes.”
(he was referring to the architectural design of a community in Los Angeles)
I began to think that life, too, only ever gives us the next bend in our road…
what comes after is, of course, a mystery
I wondered… is it really any “easier on the eyes”
or would we rather have a glimpse of what lies ahead?
I tried to imagine a road that follows a linear path,
where we can see back to where we’ve been and forward to what’s next.
There’d be instant clarity, but also the loss of mystery, spontaneity…
perhaps even a loss of joy?
I think I prefer to envision that what lies ahead has an even more resplendent architecture…
Perhaps it will be filled with the crash of waves that bend and curve along a sandy shoreline…

Or the curving smile and gaze of love from an endearing face…
 Perhaps there will be a “beach house”, something like this one…
 Filled with soft ruffling linen curves, refurbished furniture and a gentle light.


By now you know I love vintage…
♥ Pom Pom Interiors ♥
in Santa Monica didn’t disappoint.
I also love pink…
and I love ruffles…
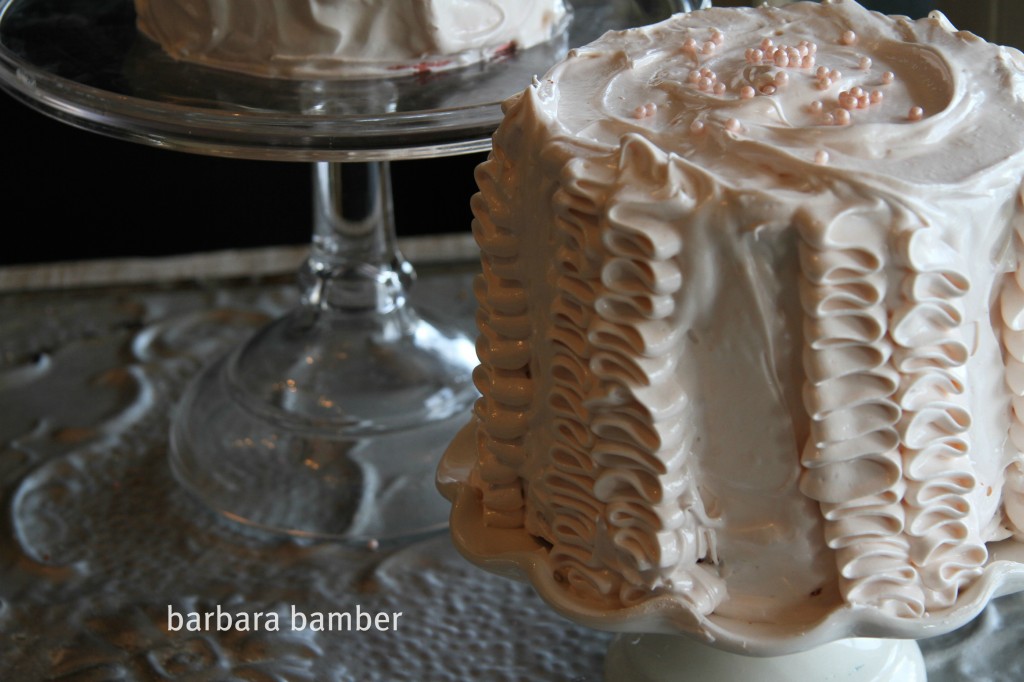
and I love pink ruffled meringue icing…
 My birthday is this week, so I celebrated by undertaking a baking project full of ruffles and ballet pink blush tones…
 I had been waiting for the perfect opportunity to make a pink rainbow layer cake.
I knew if I made it early enough… I could eat it all myself serve it at Book Club.
 It really was the perfect girly cake, reminiscent of vintage, pearls, rainbows, and all the meandering curves of life…
 I decided to try two different recipes.
mostly because the first one didn’t work out, I hate when that happens.

The first cake was snowy white and looked prettier,
but quickly deflated when the food coloring was folded in.
It did look so pretty that I decided to frost it anyway.

And the second one…
well, let’s just say it was well worth the time and effort it took to ruffle it’s meringue.


 The second cake was so yummy… but both were pretty all sliced up…
Here’s the first…

This was the first “go round”.
Here’s the second…

The was the better tasting/rising cake.
And here they are all together…

- Angel Feather Icing:
- 2 egg whites
- 3/4 cup sugar
- 1/3 cup corn syrup
- 2 tablespoons of water
- 1/4 teaspoon cream of tartar
- 1/4 teaspoon salt
- 1 teaspoon vanilla (I used almond flavoring)
- Put everything except the vanilla into the top of a double boiler (or in a large metal wide-mouthed mixing bowl) with boiling water beneath. Start beating immediately with a rotary beater or electric mixer until the mixture stands in stiff peaks. Remove from heat, add flavoring, and keep on beating until it is thick enough to spread easily. Allow to cool slightly.
- ** If you made the Simple White cake, you may wish to slice off the rounded “tops” of each layer of cake. It removes some of the “brown crumb” color in the cake and helps the layers to stack flat. I didn’t have this problem with the Snow White Vanilla Birthday Cake recipe.
- Dollop a small bit of icing on the bottom of your cake plate to hold the first layer in place. Lay down the darkest pink layer first. Spread with icing and add the next darker shade layer. Repeat until all layers are stacked. Cover the enter cake with a coating of icing on top and all around the sides.
- I've included a link below this for a Video demonstrating the ruffling technique.
- Using a Wilton petal tip (mine was quite small, #104 or #123) fill the pastry bag with icing and ruffle, beginning at the bottom of each layer. Pipe up the sides until reaching the top. Repeat as desired.
Watch this simple demonstration on the ruffling technique on YouTube: Ruffled Icing
I will now give you both cake recipes… we’ll start with the first one, well.. first, shall we?
First off, I used five 6-inch cake pans, five to be exact.. because I couldn’t figure out how to keep the rest of the batter happily risen while the first batch was baking for half an hour.
It is the recipe I found on Sweetapolita… even she wasn’t too keen on the taste, but it did bake up the prettiest. It was just so difficult to figure out how to add the dang food coloring to each layer without destroying the loft of the egg whites.
Snow White Vanilla Birthday Cake
- 1/2 cup butter
- 2 cups white sugar
- 3 1/2 cups all-purpose flour
- 1 teaspoon salt
- 3 teaspoons baking powder
- 1 1/2 cups ice water
- 1 teaspoon vanilla
- 1/2 teaspoon almond extract
- 4 egg whites beaten stiff
- Add sugar to the butter and beat until light. Sift dry ingredients and add alternately with ice water and flavorings, beating thoroughly after each addition. Fold in the beaten egg whites. Separate equally into five bowls. Leave the first pan white, then add a touch of food coloring to each bowl, adding a bit more as you go along. Fold in the coloring carefully.
- Pour into five 6-inch greased layer pans and bake at 350 degrees for about 30 minutes
When I had slightly underwhelming results, I searched up this recipe from Allrecipes. It was touted to be “a buttery white cake that comes together in minutes but tastes like you spent all day making it.” And, oh boy, were they were right!
Simple White Cake
- 1 cup white sugar
- 1/2 cup butter
- 2 eggs
- 2 tsp vanilla extract
- 1 1/2 cups all-purpose flour
- 1 3/4 tsp baking powder
- 1/2 cup milk
- Preheat oven to 350 F. Grease and flour 5 6-inch cake pans.Cream sugar and butter together in a large mixing bowl. Add the eggs, one at a time, beating well after each addition. Mix in the vanilla.Combine the flour and baking powder and add gradually to the creamed mixture and blend well.Finally, mix in the milk until the batter is smooth. Divide five equal portions of batter into mixing bowls. Add food coloring to each, gradually increasing the amount for each layer.Pour into the prepared pans and bake for 30-40 minutes until cake springs back and a toothpick inserted into the center comes out clean.
This is definitely a recipe I’d use again and again…
Enjoy!


Now that is one cozy looking bed 🙂 yummy cake!
It’s so inviting, isn’t it?? Ok, I want to be laying in that bed whilst eating the cake:) Lol! Thanks, Andy…
Oh God Barbara…. the beach is so perfect!
It was so pretty… the wind was just howling the day we were there, but that doesn’t really show in this photo.
This is just too beautiful and your writing is superb. I think it’s amazing that you gave it another go and didn’t eat the entire first cake before the second one was finished. I think that says much more about me than it does about you. Thank you for writing this and keep up the fantastic work!
Thanks so much… yes, I was longing for a piece of the first, but there was no easy way to have a taste before icing it. I thought about cutting a piece out and filling it with icing… 🙂
Absolutely beautiful Smidge and Happy Birthday! What gorgeous cakes. They look perfect to me. I love the coloured layers going from brightest to softest pink. And I love meringue icing. Love how you frosted the cake and then put on the pink cachous. Very clever. It’s just gorgeous. Wish I could have had a slice! Oh, and the photos are wonderful. I would love a beach house decorated like that too.
Thanks so much, Charlie:) There were really very fun to make.. it took time but the techniques for everything were really simple. I’ve had so much fun with my icing bag and tips (I know, I’m a little strange)! xo Smidge
Wow, spectacular piping on that cake. And the setting is so beautiful!
Thanks so much, Joanne:)
Lucky lucky book club. Mine meets next week and so I will photograph what we eat to compare. HA!
Have a wonderful birthday. The cakes are a dream.
A beautiful post.
Too funny!! I have no doubt in my mind there will be a feast at your book club:) Will Flat Ruthie be there? Oh, right, you will so she doesn’t have to.. 🙂 xo Smidge
Gorgeous, gorgeous ruffled frosting! A girly cake if there ever was one. Happy Birthday!
Well, thanks so much, Sharyn… sometimes I love rustic, other times I love girly. It was fun to do!
A very Happy Birthday to you Smidge. How perfect 2 cakes one for you and one for your family. Beautifully vintage home and cake, like a little princess home. Hope your day is very special. Take Care, BAM
Thanks so much… it does look like a princess home and wish I could decorate my whole house like this:) xo Smidge
Absolutely lovely cake! So worth the effort!
Thanks, it really was.. not a lot of work, but fun! xo Smidge
Like. Like.
Like… you:) xo Smidge
The pink ruffle cake is so very very pretty. I would love to be in your bookclub to share a slice of it. I would like to wish a very Happy Birthday. Enjoy your special day. x
Hmmm… maybe a virtual book club, I’m sure they abound, but then we couldn’t share cake, could we. Wishing you were here as well:) xo Smidge
Happy Birthday! What beautiful cakes you made for yourself – not sure I would tackle such intricate frosting – kudos on such brilliant work!
Such beautiful photography again today – I would like a set of everything from that beach house please.
🙂 Mandy
Thanks, Mandy.. it was pretty easy, just a lot of zig zagging with a pastry tip. And no worrying about whether it’s perfectly straight, etc, made it even more fun! I would send you the whole beach house… if I could:)
That cake looks so good, It even looks better than commercially brought wedding cakes
Wow, that is such a nice compliment, thank you:)
Wow! Your verse and illustrations would have been more than enough for most — but not you. No, instead you take us along as you explore a beach house, beautifully outfitted. Still not satisfied, you bake a cake that anyone would be more than happy to receive — but you. Nope, it’s not your best, so, a new cake is prepared. And, like we should all have expected, the 2nd cake is a marvel! Smidge, your posts are always so artfully prepared and beautifully presented. This post is a real standout! Just plain lovely!
Thank you so much, I’m so glad you enjoyed this post. It was fun to plan… and experience as well. That beach house is a shop and such a lovely one.. I wish we had one like it here:)
Now that’s what I call *a cake* – fabulous! Great post, Smidge. 🙂
Lol… thanks.. the rest is in the freezer waiting to be taken out and devoured… one day this week. Wish you were here to share:)
Beautiful thoughts – Beautiful cakes.
Me gusta mucho. 🙂
Gracias!! That is so kind:) xo Smidge
Oh the curve of a sandy bay, and the lovely cool creams and whites of the beach cabin, to your grogeous fluffy and frilly cake. Happy Birthday! And what a wonderful way to celebrate 🙂
It was a wonderful experience being there.. and the cake was delicious:) Thank you so much!
Gorgeous creration! For that matter, gorgeous blog!
I like the extra pics you’ve included; a well-rounded post is a superior one.
It’s tough to cull the best photos.. I have so many more. I’ve finally made a facebook page to post the rest of the photos that I love… Thanks, Hook!!
Absolutely stunning and birthday greetings to you (we must almost share a birthday!). I am (almost) lost for words at the sheer beauty of everything here. And not one, but two amazing cakes. Incredible.
When is your birthday?? I guess I will find out on your blog:) Happy Birthday to you as well! xo Smidge
You’ve raised the barre with this one! That’s one (er, two) bloomin’ beautiful birthday cakes, barbara bamber! What a splendid post, Smidge, lovely in every way! May our birthday rise to meet you, and may your path curve ever-so gently, and ever-so long! xo
Oops, please correct to read “your” birthday.
Spree, you always write such lovely words of praise.. and a metaphor today (or is that a simile??) I love how positive you are!! I’m be happy to dance at a barre alongside you any time.. Thank you so much! xo Smidge
Oh how gorgeous are those cakes?! Wow! I’m always so impressed by cakes because I just cannot for the life of me pull a good one off – especially with good frosting. These are just so beautiful!!!! I’m sure they were tasty too.
This is such a lovely compliment, Kristy.. I know you could do this, just looking at your blog is a testimony of your skill as a chef and baker:) xo Smidge ps the second one was tasty… the first.. maybe I did something wrong…
Happy birthday, Barb!! And what a way to celebrate – those cakes are simply amazing and gorgeous. Wow! wow! wow! I am so impressed.
Thanks so much, Courtney!! xo Smidge
happy birthday darling and I hope you found something perfect in that absolutely perfect shop. I am sending the name of it to my son.. so he can do some Mama shopping in there next time he is in town and how could your BEAR to cut that cake! Those beautiful cakes! What a SOUL ,, hope you had a lovely lovely day.. c
Thanks, c… the shop is in Santa Monica.. not here, sadly enough. However, they do have an online shop… could be dangerous:)
Happy early birthday. That’s a wonderful cake! Love the bulldog too, you know I’m partial to dogs.
I HEART that cake – just amazing! I love bulldogs – oh so cute. Thanks for sharing – now I want a piece of cake!
So beautiful! I am horrible at decorating cakes. Horrible. Thankfully, my kids still think ugly cakes taste good…
Um, that’s weird that it said I was Anonymous! Hmmm…anyway, it’s me and I meant to say, too: Happiest of birthdays to you! At least having a January birthday gives us something to look forward to in this long, cold month of winter! Enjoy your day!
It does that now and then on my blog.. I’m not sure why? I know I have a few Anonymous comments showing up here and there. I hope I have my settings corrrect.. because I don’t screen my comments, they should just appear. Anyway, I’m glad you reposted now I know it’s you!! Thanks so much, Gretchen!!
All right, Birthday Girl! First, may you have the most joyful, lovely, and delightful-surprise-filled birthday possible (on this birthday that you share with one of my *other* sisters!). May your year ahead be filled with beautiful things that make your heart hum hymns of happiness. May you have an immense number of wonderful birthdays yet ahead, celebrated in good health and hope! And may there be large quantities of waves on welcoming shores, smiling faces full of love, pretty and cozy surroundings, and exquisite pink ruffled frosting in every day of your life!
Love,
Kathryn
A benison (sp?), alliteration… and celebration.. what a lovely gift, Kathryn.. I’d be the luckiest girl in the world if all of this comes true:) xo Smidge
Delightful. Delicious. Delovely. – Thank you!
Happy Birthday. Just been tweeting and pinning this post like crazy…absolutely lovely!
Thanks so much! I forget that we can tweet and pin each other’s work… very kind of you:) xo Smidge
Happy Birthday! What a gorgeous post. From the vintage to your beautiful cakes… 🙂
How gorgeous are those!! I love vintage and love the creamy off white look in that bedroom. I’ve always wanted a chandelier over my bed!! I have that look in my room now, minus the chandelier!! How patient and determined you are to create not one but two cakes of love!! The pink is soo pretty and the little pearls on top, ribbons on the side…I just love it! Warmest, happiest wishes to you!!! Happy Birthday!
You are so lucky to have this in your bedroom.. that’s awesome!! I would adore it, and the chandelier would be amazing. I hope you get one soon!! Thanks so much for your birthday wishes:) xo Smidge
I just LOVE your kind of vintage. You definitely have style.. and I always love coming here to see what new stuff I will get to learn or see :). And these cakes even have a vintage look to them. This post is simply beautiful and decadent all at the same time :). Happy Pre-Birthday :).. Aquarius woman rock!
Thanks, Kay… I’m quite content being an Aquarius (not that I had anything to do with it)… Happy Birthday to you as well:) xoxo Smidge
“Can you see how the gentle curve of the road is designed so that you can only see so far ahead… it makes the view easier on the eyes.”
…. these words captured me and I thought of this, I never heard before something like that…What an impressive expression! ….how gentle curve of the road is designed…. These words actually seem so simple and describe us a view of a road… But no, there are more than this! The road is designed so gentle with a curve… The designer hits me. Then the eyes who noticed this road in this way… and of course the narrotor (should be all of them you!) I can talk more on about these words if my English language were so good as my native language. You are so nice dear Barbara… Your eyes find the beauties in life… I love vintage too and I love vintage colours too… But what about these amazing cakes, if you ask, I fall in love… so romantic… I can’t eat (I know, I am sure it is so delicious, so delicious) but probably I watch this artistic cake… Thank you my dear Barbara, with my love, nia
I think you’ve done a remarkable job in a language that is not your first one… I, too, loved this saying and am so glad that it touched you as well! xoxo Smidge
Happy Birthday too dearest, your words made me so excited and almost I forgot to say my wishes… 🙂 Love, nia
Happy Birthday Barbara — the cakes look wonderful. And that shop looks amazing…falling off into dreamy land!
God, these are beautiful. I love, love, love the gradients and the ruffles in the frosting!
Happy Birthday, Smidge! I hope you had a great celebration. What divine photos and truly stunning cakes…I’m speechless!
Oh my! Your cakes are absolutely beautiful … your time spent definitely paid off! I love the ruffles!
It was hilarious… the icing was everywhere!!! But great pink fun!!
Barbara- these cakes are absolutely stunning! I love the way the color lighten through the layers of the cake. Talk about talent!
I’m thinking of trying this again, with the real colors of the rainbow.. or perhaps purple?? Thanks so much!! xo Smidge
Beautiful! My favorite post I read today. Love your blog, and the cake looks divine. I think I’ll tackle that recipe for my daughter’s 20th birthday. She loves pink. Delicious Wishes!!
Oh Smidge, this post talks to my heart. I love every singe photo!
Happy birthday Barb!
I loved reading every word of your post!
I had to go to work last week in the fog and I was thinking along the lines of your post. sometimes in life you can see ahead for a distance and know where you are going and in others you just see a few steps ahead and have to keep going one step at a time.
Both cakes are amazing. I love the shades of pink and the ruffles..brilliant job
You are so right… I’m so glad we think along the same lines… I so appreciate your compliments! 🙂 Smidge
Happy Birthday! Lovely photos, as ever. The cake looks absolutely wonderful. Your recipes always look declicious, but the decoration of that cake looks AMAZING! It looks too perfect to ever be touched! 🙂
Lovely!!! The only thing better than that cake or that shop would be to eat the cake in the shop!!! Dreamy Creamy Deliciousness
Stunning photos and vignettes (as usual!)
Wow, just WOW!
I love visiting your blog. It’s always filled with beauty. 🙂
That is quite possibly the prettiest cake ever…if that was served as my birthday cake I think I would be one very happy girl. Just lovely!
SO impressed right now. Both of these cakes are stunning!! I can’t believe you made two. That takes some patience and dedication. 😉 I’m sure they were a complete hit. Perfect birthday cakes. 🙂
The ruffles look absolutely gorgeous! Thanks for sharing.
Everything about this post that is positively beautiful…even poochie-face!
Wishing you a very ♫♪ Happy Birthday ♪♫ ! ~Christy
Love! Those cakes are perfect! Happy Birthday!
Wow, these are amazing creations!
Happy Belated Birthday, Smidge! Your photos soothe my soul… x
That ribbon cake is amazing. If Paris was a cake, it would be that cake!
[…] I have seen various versions of rainbow coloured cakes around for a while, from mini cupcakes, to regular sized ones with splodges of different colours, to multi tiered cakes. For a beautifully elegant grown up cake, do pop over to see what Smidge did for her birthday. […]
Happy belated Birthday, the cake(s) is(are) beautiful as are all of the photos. I love seeing a bend/curve in a road and wondering what will I see that catches my eye… your photography is beautiful. I will pretend that one of the two cakes is for my birthday… today! I love rainbows and pink is special…
Oh, my goodness.. Is it your birthday today as well, then? Lovely, I would send you one of these straight away if I could. Happy, happy, happiest of birthdays to you!! Xoxo Smidge
Beautiful!! Absolutely beautiful!! I have seen that recipe on Allrecipes, now I’m interested in trying it! The recipe for your meringue was a little different than mine, maybe that’s why yours tasted good and mine was terrible? Mine has A LOT of butter in it, I think that’s what ruined the flavor (which is weird, I LOVE butter). I also love the way you didn’t ruffle the entire cake, it looks so classy! I’m thinking I’ll give your meringue recipe a shot and see if I might actually frost something with it!! Thanks!
I live strawberry, im sure it was delicious! Lol, just in case think we both need to make another one, just for research purposes;) another blogger made a rainbow cake today, it was so pretty! It is at http://www.chicaandaluza.com!
Happy Birthday Smidge! Thank you for sharing your two lovely cakes. I must say I don’t know when I have seen a more girly cake. It does remind me of all things vintage.
Thanks, Karen… Some days I just crave girly stuff.. Or any cake, I guess, lol! Xo Smidge
Aw! Happy belated birthday, Smidge! Gorgeous cakes. They’re so you! Now how did you get the uber girly pink color? We have a Valentine’s baby in the office and she’s requested a pink cake. This could be it! 🙂 ~Ruth
Oh just pick up Wilton’s pink gel and use a teensy teensy bit on a toothpick.. U can add more but won’t likely need it. Let it really beat in because at first u think it’s not going to go pink and them suddenly it does! Awesome stuff! And a better true color than liquid I think:)
Sent from my iPhone
So beautiful!
Thank you:)
Those cakes are just sooooo impressive ! Happy birthday !
Wow! They look absolutely spectacular! I bet they were both delicious too. 😀 I wish I could make something as elegant as this!
[…] […]
[…] breads and anything baked it’s just an eye candy not to be missed, look at these cakes like the Pas de deux blush pink ruffled rainbow layer cake, this Lemon meringue rose petal cake and this Vegan carrot cake, just the icing work on them are […]